
DropFunnels Checkout Form and 2 Steps Module
The Checkout Form module is required in order for you to collect payments for the sale of your Product and Services to your customers.


As such, you will need to integrate a Payment Gateway (Merchant Account) of your choice and connect it to your Funnel and Checkout Form.
Currently, Payment Gateways that can be integrated natively with DropFunnels are as follows:
- Stripe
- Paypal
- NMI
- Authorize.net
- CoinPayments
Aside from that, you can also connect your choice of Autoresponder with the Checkout Form module. This will allow your automate the process of buyer leads for email marketing purposes.
To view the full list of autoresponder that integrates with DropFunnels, follow the link below:
Important Notes for using the Checkout Form module:
- A Product is required for this module to work. Please see this article on How To Create A Product.
- When using Paypal for the checkout, all required information or fields should be set to “Show” (like the phone number and billing address field). If you do not need that information, it is best to not include it by simply deleting the said unnecessary fields.
If your checkout form is not working, please check this troubleshooting article:
Related articles:
Checkout form General Settings
The General settings of the DropFunnels checkout form include the following settings, Form Field, General Form Settings, Checkout Labels, Checkout Icons, Pipeline, and Autoresponder.
Form Field
This setting allows you to add and edit the important information that you want to collect during the checkout process.

You can also move, duplicate, and delete a field by clicking the icons on the right side of the fields.

Another cool thing it does for you is it allows you to edit the field and gives you control to hide or show the field, select the field type, add a label and placeholder, make the field required or not required, and even control the width of the field.

General Form Settings
This setting gives you the option to Enable or Disable the Display Required Mark, Label, and Placeholder.
It also gives you the ability to select the Accept Type between, Checkbox or Signature pad. By default these options are hidden, if you want to show this on your checkout form you need to go to each Accept type option and select Show on Terms and Condition Checkbox or Signature Pad.

You can also find the General Form settings an option to add a list of States to exclude during the Checkout. Finally, you can Enable/Disable Order Summary and declare where to redirect your customer after completing the form, this is called Success Redirect. Success Redirect gives you an option to redirect customer to the Next Funnel Step (Recommended) or to a Custom URL of your choice.

Checkout Labels
Checkout labels are an option to add a Label to your checkout form, you need to be clear in adding a label for your clients to know where they are in the checkout process.
Select Product Label - this is only applicable if you are offering Multiple Products.
Order Summary Label - when order summary is enabled from the General Form Settings this will show a description of the product that you declared from Dashboard >Funnels > Products.
Payment Method Label - This is where your clients can choose their Preferred Payment Method.
Terms & Conditions Label - If you choose to show the Terms & Conditions Checkbox and Signature Pad this label will appear and the Terms & Conditions you created.
Button Text and Sub-Text - This is where you can add a strategic Label to your checkout button and is a good way to convince them to proceed to the checkout.

Checkout Icons
This is where you can customize the icons that can be found on your checkout labels.
You can:
- Select an Icon
- Select a Color for your Icon
- Select Icon size
Pipelines
A sales pipeline is a visual way to track potential clients as they go through different Stages. This is where you can enable or disable Pipeline. When enabled it will collect the information from the Optin form and will ask you to choose which Pipeline and stage you want to send your client's info. To learn more about DropFunnels Pipeline Click here.

Auto-Responders
This option will allow you to connect your Facebook Marketing App like Facebook Pixel. To learn more click on the following article:
How To Setup Facebook's Conversion API (CAPI) With DropFunnels
How to add Facebook Pixel or any Global Tracking Codes
You can also connect your auto responder to send your email confirmation or email marketing campaign. To learn more about how to connect your Auto-Responder click here.
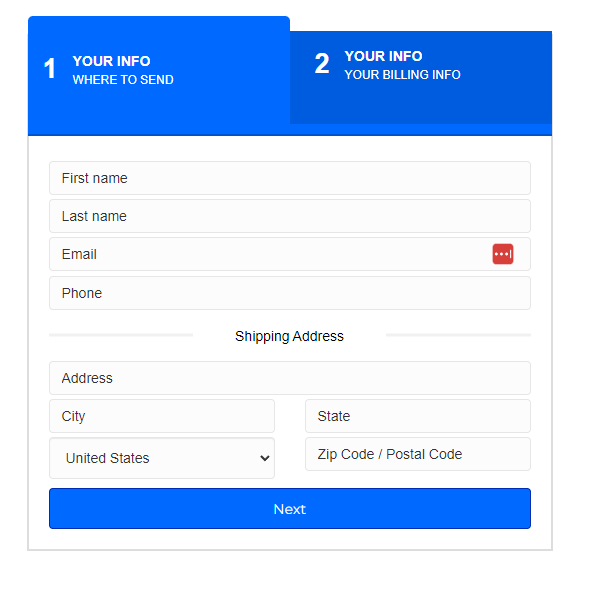
2-Step Checkout Form
The First Step Collects basic information and sends that over to the autoresponder immediately, the Second Step screen then collects additional information such as billing address, card details, etc.
The selected autoresponder will not fire once the checkout process is completed, it fires only to let you know the customer has progressed past the 1st step.
 The settings of the regular checkout form and the 2-step checkout form are the same. One only advantage that this has is when your lead completes the first step on the checkout form and then decides not to purchase, the information that the lead entered on the the first step will be saved in the DropFunnels account.
How To Use The Checkout Form Module
Step 1: Add a Checkout Form module
Inside the builder page, click to select the "Checkout Form" under Sales Modules and drag it to the designated row or column where you want to add it.

Step 2: Add the Product
Please see this article on How To Create A Product here.

Step 3: Save & Publish
When performing a test purchase make sure you follow the Check #3-#7 from this guide https://support.dropfunnels.com/knowledge-base/sales-funnel-troubleshooting/.
And that's it you're done! You should be able to perform a test purchase or begin selling your product using the Checkout form module.