How To Create Your First Sales Funnel
Funnels can be used to collect leads, sell products, promote webinars and more.
They consist of two or more steps, and guide your visitor through the process to your intended goal.
In this article, we'll build out a sales funnel to collect leads and sell a product. It consist of the following:
Create Your Landing Page
First up, we'll need somewhere to collect leads. We call this a Landing Page. A Landing Page usually consists of a headline an optin form, and some more information about your product.
Remember, the goal of this page is to collect the leads' email address.
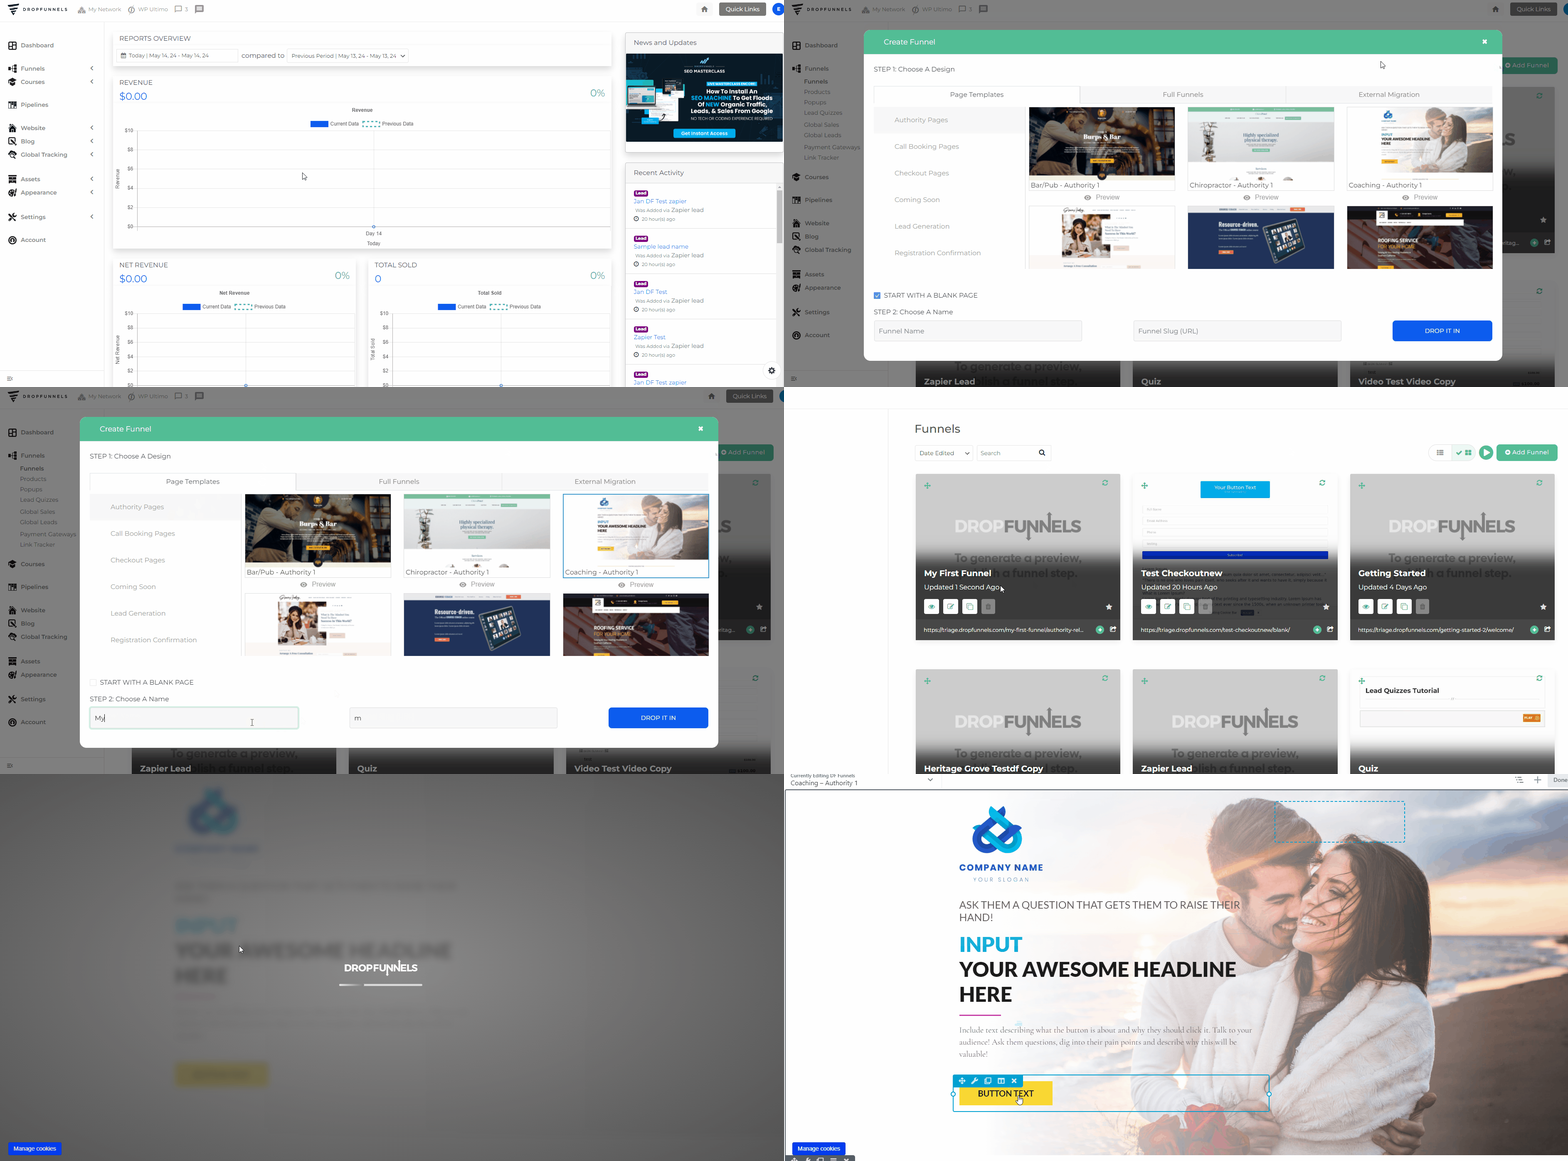
Step 1: Navigate to Funnels
Click on the "Funnels" tab in your DropFunnels dashboard, it will then show a dropdown menu and you need to select "Funnels"
Step 2: Start a New Funnel
Click on the "Add Funnel" button at the top right corner it will show a popup to choose a template and add the name and slug of your Funnel.
Step 3: Choose a Lead Gen Template
Select a Lead Generation template from our template library
Step 4: Add a Funnel Name and Slug
Make sure to add a Funnel name and slug that matches your content because this is the link that you will be using to promote your Sales funnel.
Step 5: Customize the Page
Update the content and design of the page to match your offer and branding.
Create Your Sales Page
If leads have entered their email, they're proving that they are interested in what you have to say! Now it's time to take advantage of that and really sell them your offer.
Again, keep the goal of the page in mind.
Sales pages start with an attention grabbing headline, whilst also including all of the content needed to sell your offer. This should include details of your offer, social proof (testimonials) and an FAQ.

Step 1: Add Your Sales Page to Your Existing Funnel
Click 'Add Funnel Step' on the Funnel Flow tab of your funnel and select a sales page template from the Sales Pages tab.
Step 2: Customize the Page
Update the content and design of the page to match your offer and branding.
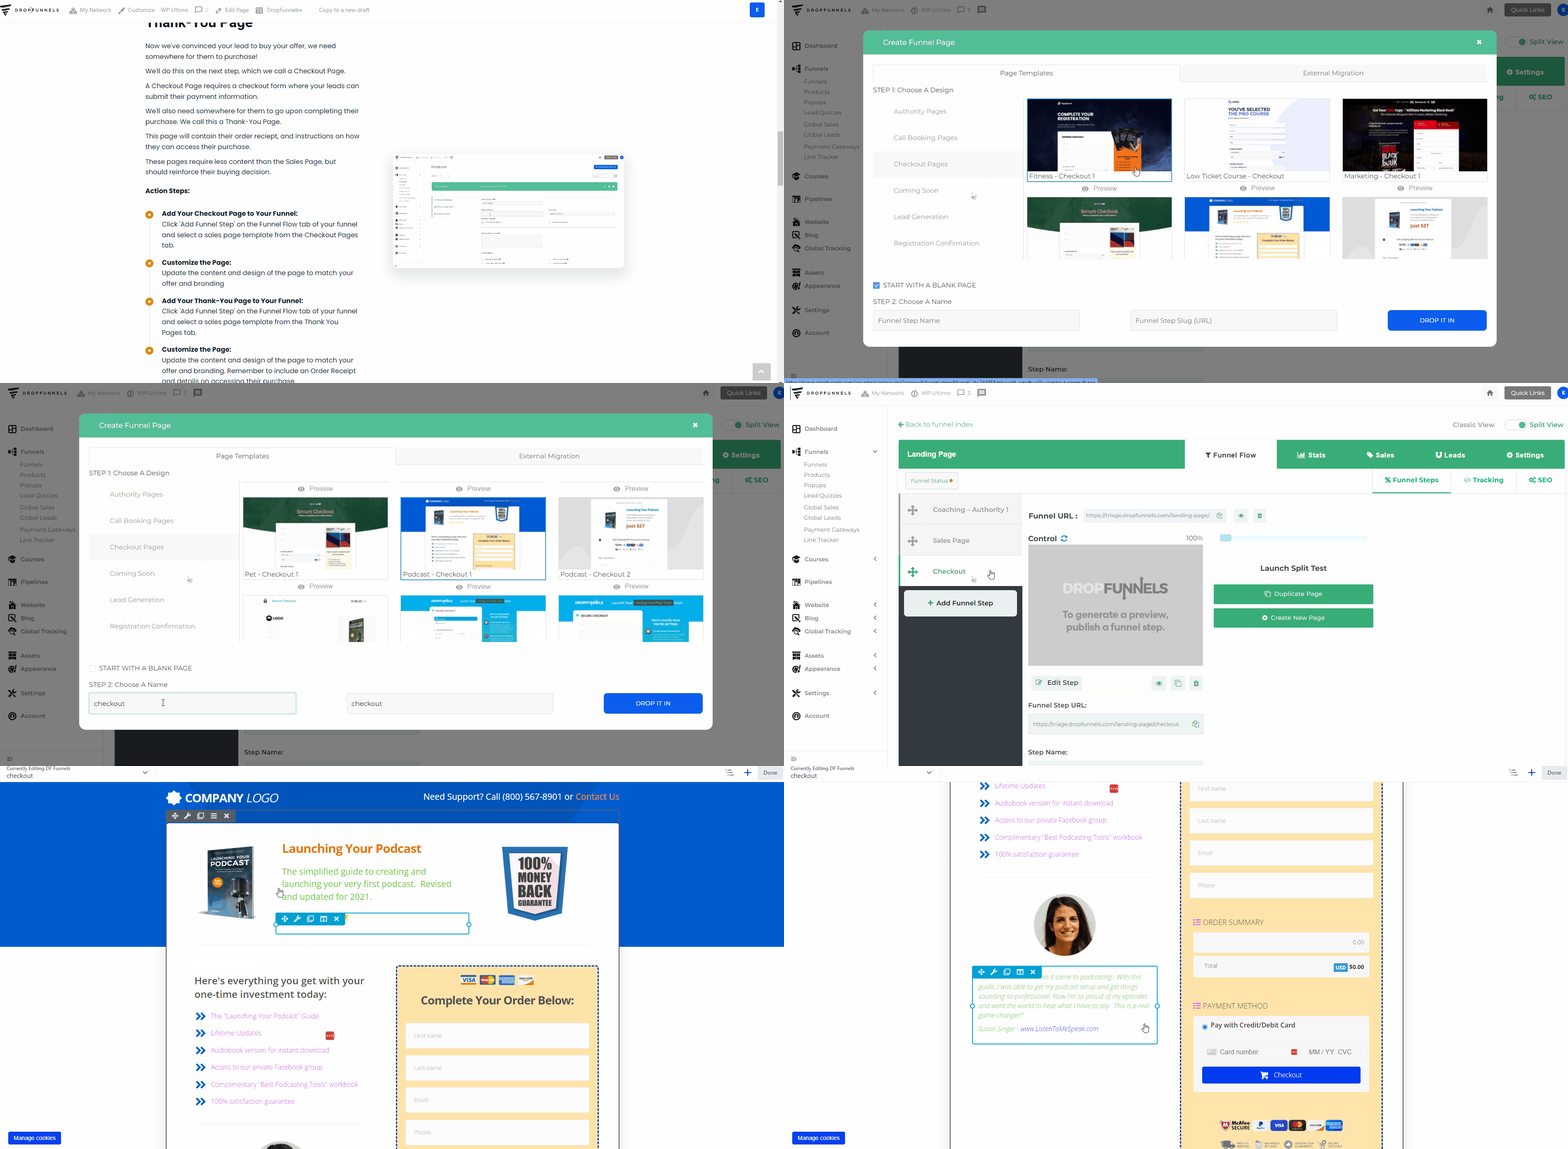
Create Your Checkout Page
Now we've convinced your lead to buy your offer, we need somewhere for them to purchase!
We'll do this on the next step, which we call a Checkout Page.
A Checkout Page requires a checkout form where your leads can submit their payment information.

Step 1: Add Your Checkout Page to Your Existing Funnel
Click 'Add Funnel Step' on the Funnel Flow tab of your funnel and select a sales page template from the Checkout Pages tab.
Step 2: Customize the Page
Update the content and design of the page to match your offer and branding.
Warning: Only add one checkout form, adding 2 or more checkout form will break our DropFunnels Builder.
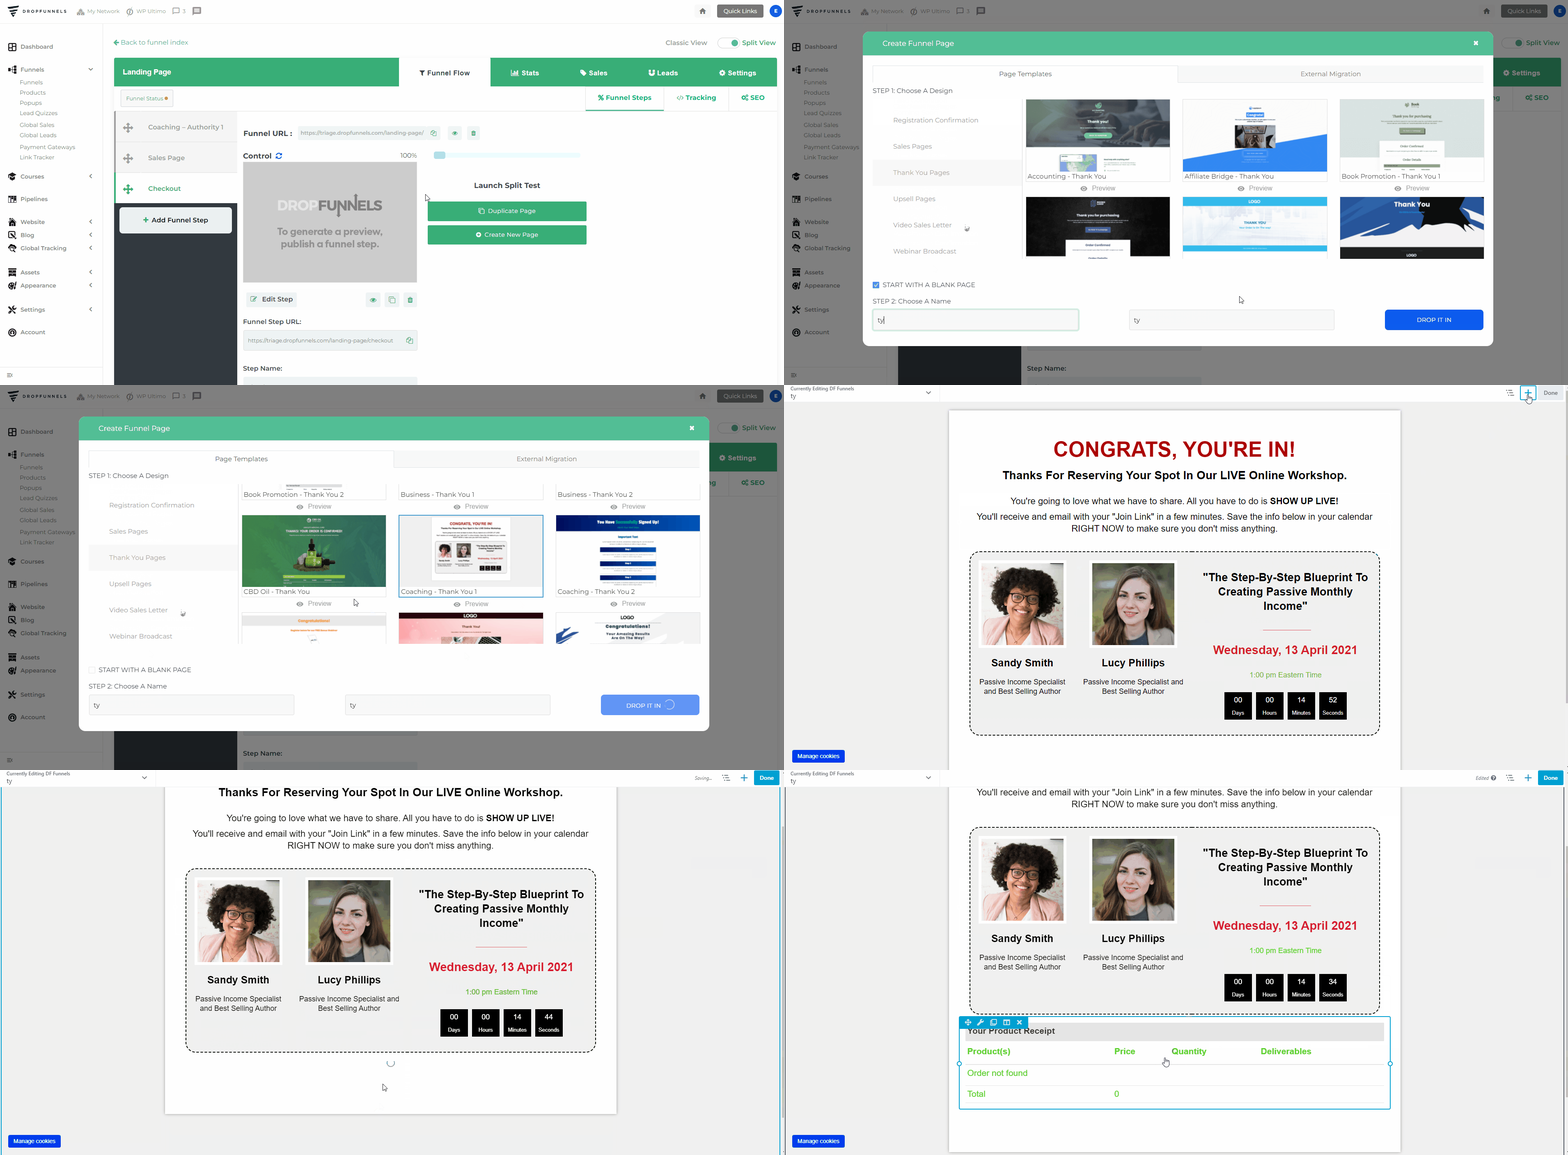
Create Your Thank-You Page
We'll also need somewhere for them to go upon completing their purchase. We call this a Thank-You Page.
This page will contain their order reciept, and instructions on how they can access their purchase.
These pages require less content than the Sales Page, but should reinforce their buying decision.

Step 1: Add Your Thank-You Page to Your Funnel
Click 'Add Funnel Step' on the Funnel Flow tab of your funnel and select a Thank you pages template from the Thank You Pages tab.
Step 2: Customize the Page
Update the content and design of the page to match your offer and branding. Remember to include an Order Receipt and details on accessing their purchase.
TIP: Make sure that the last step of your funnel has the Order Receipt. If your Order Confirmation email does not get delivered within 3-5 minutes upon successful purchase, that means that your Order Receipt page is not the last page of the funnel. This will result in the confirmation being delivered after 20 minutes.
Now that you have completed and customized your first sales funnel. You just need to Create a Product that you want to sell, Connect Your Payment Gateway, and Connect Your Product to your Checkout form and you're done!
Here are helpful articles that could also help you:
How To Connect Your Product To Your DropFunnels Checkout Form
How to Integrate DropFunnels with Stripe Payment Gateway


