"We are revamping our Knowledge Base articles to serve you better. In case you find something unusual, do not panic. Reach out to our Support Team by submitting a ticket if you ever need some help.”
  1. Home
  2. DropFunnels Builder / Editor Basics
  3. How to create a “sticky row”

How to create a “sticky row”

How to create a "sticky row"

If you want to create a row at the top of the page that stays in place when scrolling, with a little bit of CSS code, you can accomplish it very easily.

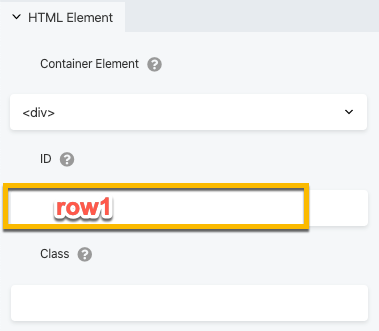
Step 1: Go to your Row Settings > Advanced and add a unique name in the ID field, ex: row1

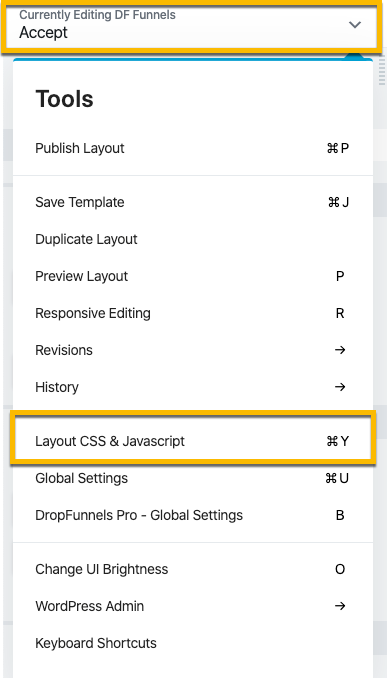
Step 2: Navigate to the "Layout CSS & Javascript" area in the mega dropdown menu in the builder or use shortcut keys CMD/CTRL + Y.


Step 3: Under the CSS section, add the following code.
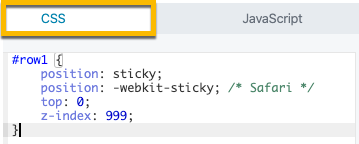
#row1 {
  position: -webkit-sticky; /* Safari */
  position: sticky;
  top: 0;
  z-index: 999;
}
Was this article helpful?

Related Articles

1 thought on “How to create a “sticky row””

  1. This was VERY helpful Jordan. Thanks for the video!
    Now I know how to add any temporary or permanent message sticking to any page.
    Thanks again.

Comments are closed.

DF Black Trimmed

ANNOUNCEMENT:
Our Knowledge Base articles are undergoing a comprehensive overhaul to enhance your experience.

If you encounter any unexpected issues or irregularities, feel free to connect with our Support Team by submitting a support ticket for prompt assistance.
Join our Slack Workspace

Join the DropFunnels Slack Workspace and get access to the DropFunnels team, other DropFunnels members, twice-weekly support calls and more!

Join our Slack Workspace

Become A DropFunnels Wizard


Complete our Fast Start Training and learn everything you need to know to launch your first or next funnel.

From Lead Capture to Products, Courses to Blogs, this easy-to-follow training covers it all.

We’ll even give you $50 credit for completing the training!


Become A DropFunnels Wizard