How To Integrate DropFunnels With NMI Payment Gateway
NMI or also known as Network Merchants is one of the most widely used payment gateways that you can use for your business to collect payments online, especially if your business is considered "high risk". Then NMI is a great payment gateway alternative.
DropFunnels now integrates with NMI to provide convenience for businesses whom has been rejected by Stripe or even being shut down by PayPal because what you sell is against their terms of service.
If you already have an NMI Merchant account, follow the steps below to integrate it with your DropFunnels account.
Let's go through what you need to retrieve from your NMI account. You essentially need just 2 security keys to connect to your DropFunnels account.
Step 1: From within your NMI Account, click Options on the left menu bar and select Settings.
Step 2: On this page, go to Security Options and click Security Keys.
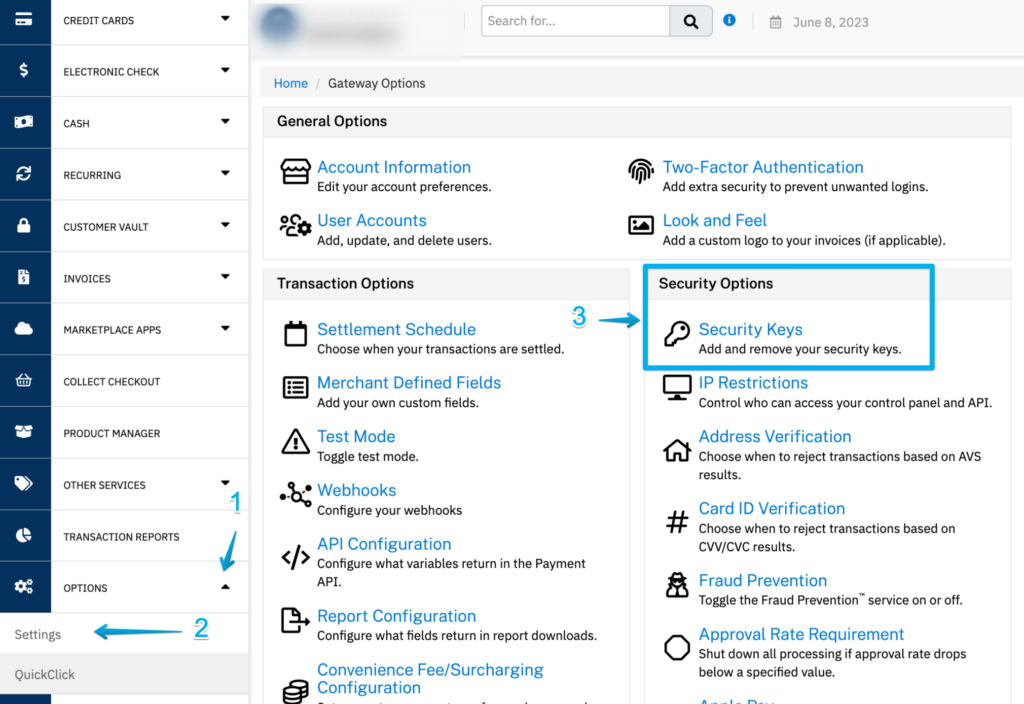
Step 3: There are 2 security keys here: Private and Public Security Keys. We need both keys to paste into your DropFunnels account.
Private Security Keys:
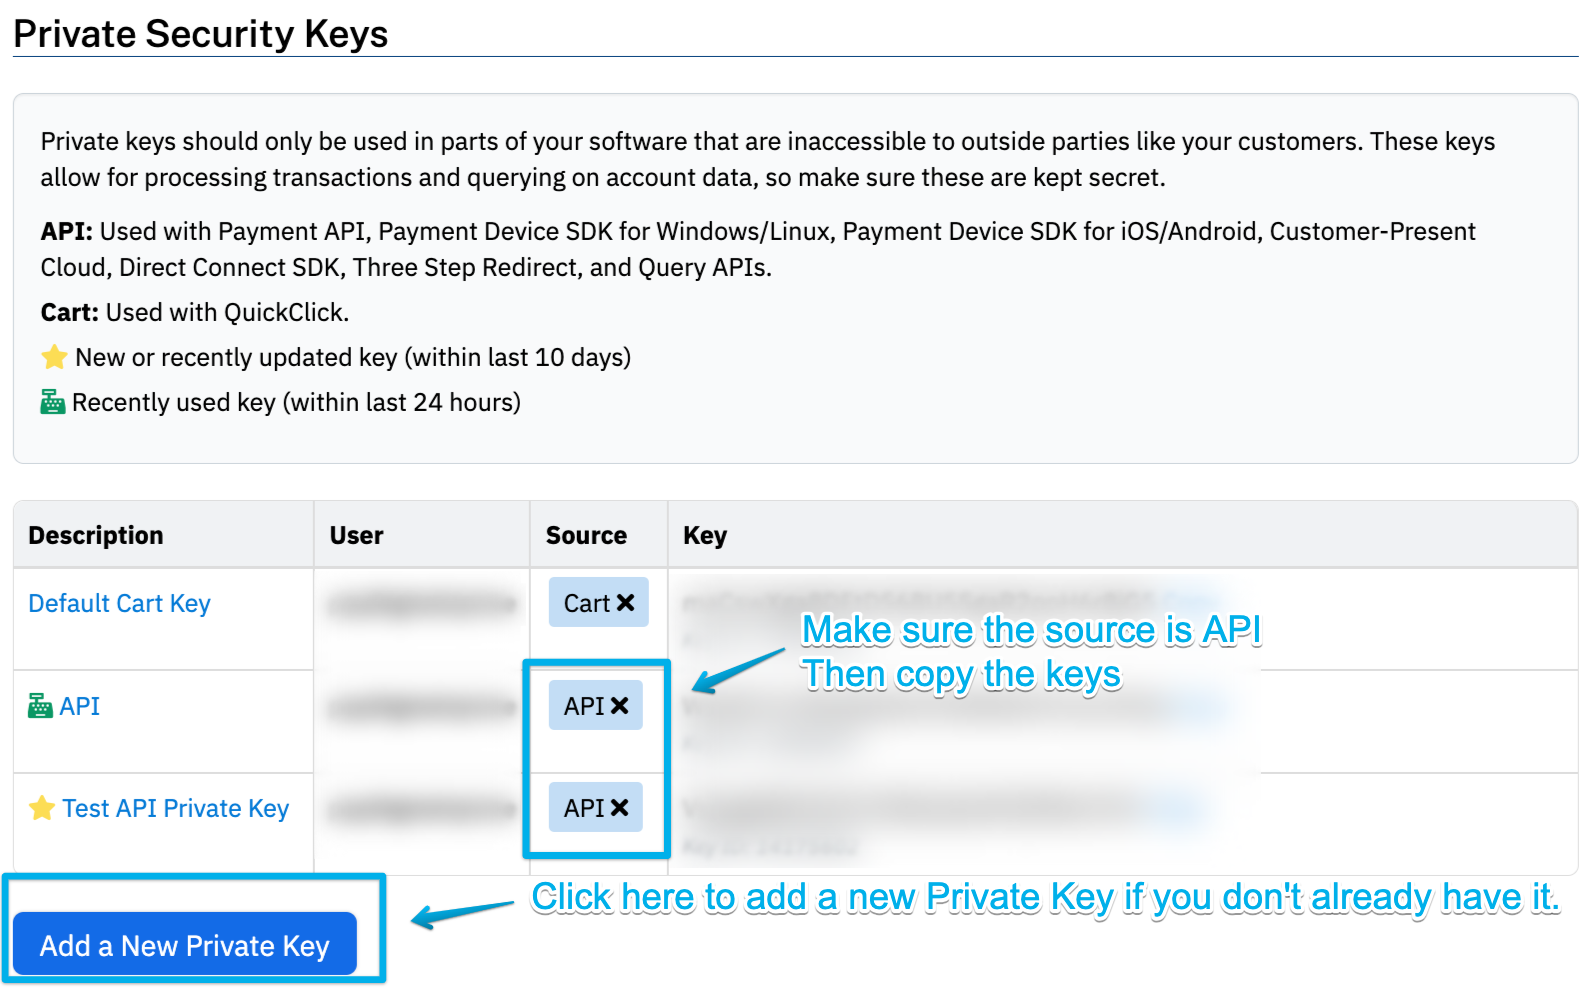
If you have an existing Private API Key, you will need copy that.
NOTE: Make sure that the Source or Key Permission is "API".
If you don't already have an existing Private key, you will need to create a New Private Key.
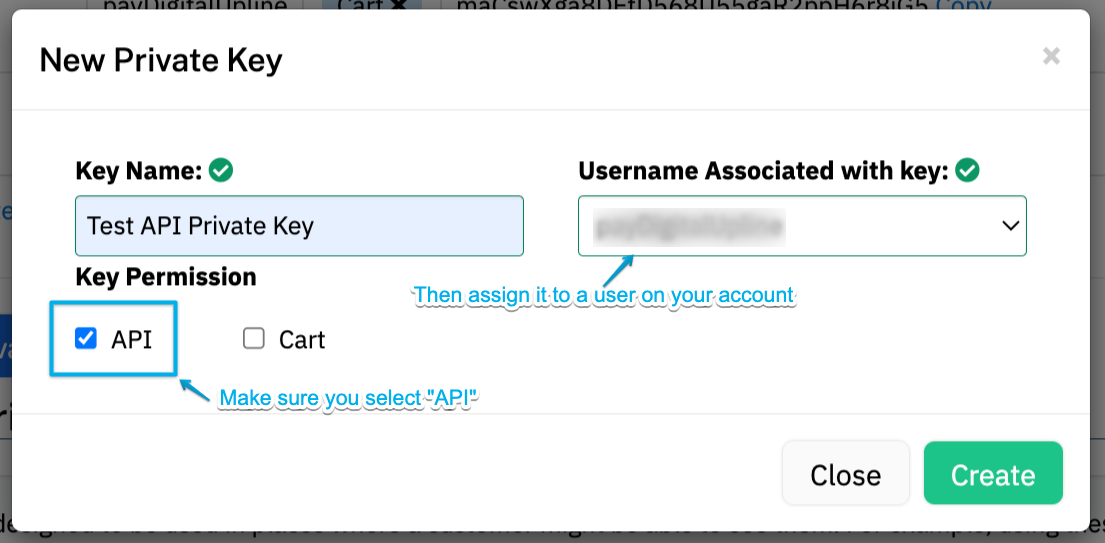
Click Add A New Private Key > give your key a name > make sure you select API as the key permission > assign it to a user on your NMI account > click Create Key and a new Private key will be generated. Copy the key.
Public Security Keys:
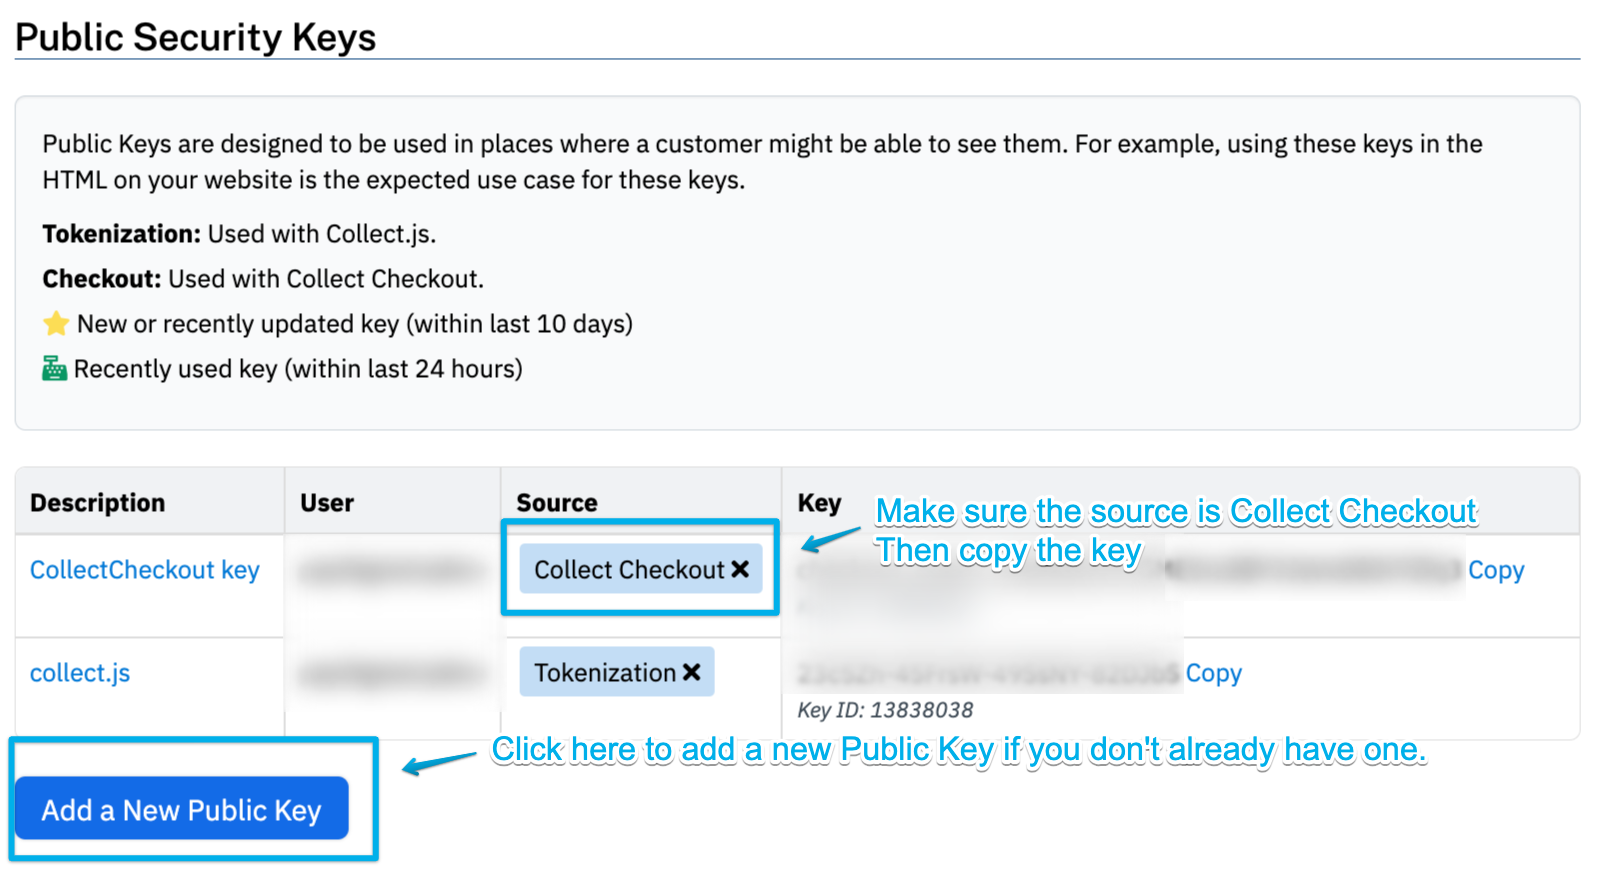
Now for the Public key, make sure you copy the key with the source or key permission set as "Collect Checkout".
NOTE: Make sure that the Source or Key Permission is "Collect Checkout".
If you don't already have an existing Public key, you will need to create a New Public Key.
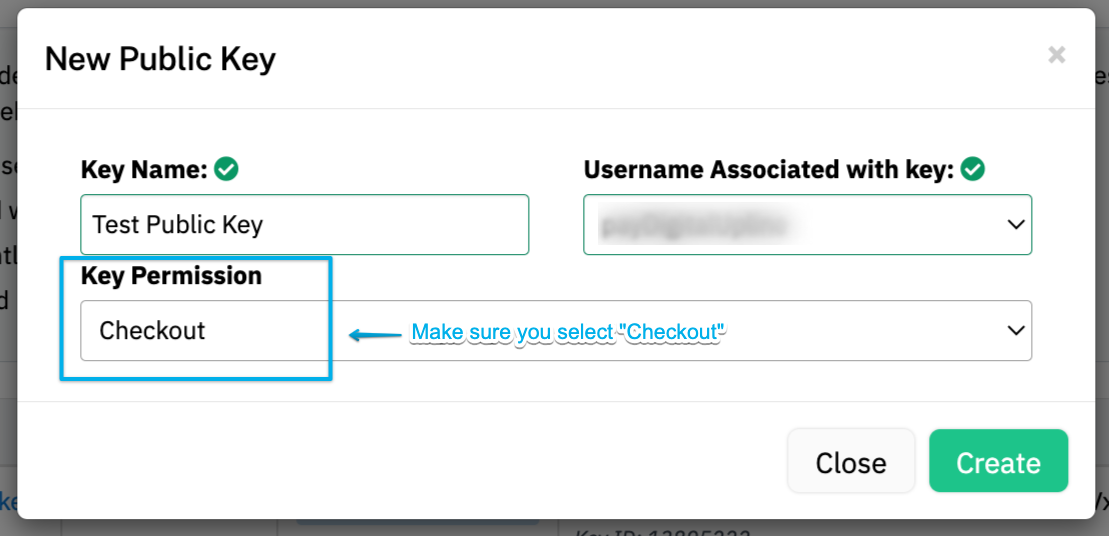
Click Add A New Private Key > give your key a name > make sure you select "Collect Checkout" as the key permission > assign it to a user on your NMI account > click Create Key and a new Public key will be generated. Copy the key.
Now that you've copied both the Private Key (API) and the Public Key (Collect Checkout) from NMI, it's time to connect it with your DropFunnels account.
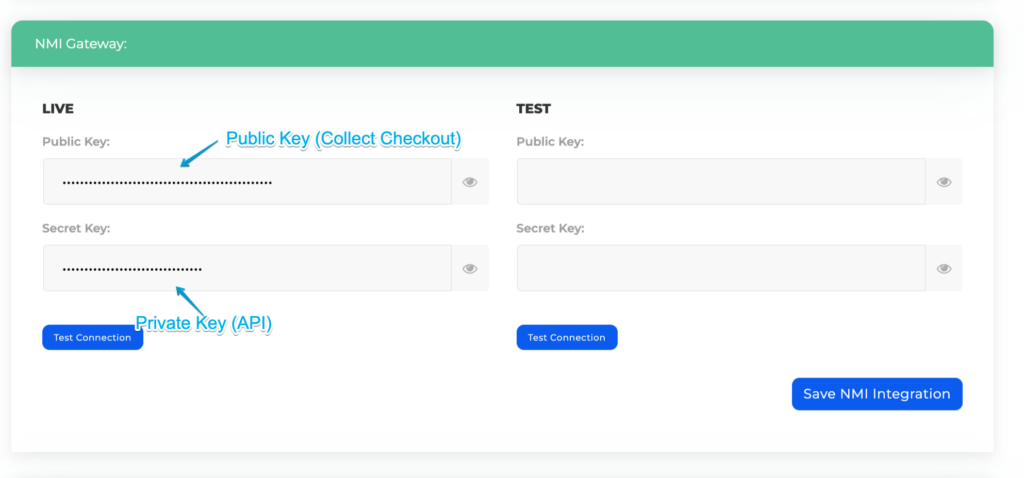
Step 4: On your DropFunnels dashboard left navigation panel, go to Funnel > Payment Gateway > scroll down to NMI Gateway
NOTE: Paste your keys under the LIVE column. This will allow you to collect live payments.
For TEST transactions, click here to go below for instructions to set up.
Public Key: This is where you paste your NMI Public Key (Collect Checkout)
Secret Key: And your Private Key (API) from NMI goes here.
Before you save the integration, click the Test Connection button to see if it's connected successfully. In case it's not, make sure you paste the correct keys in the respective fields without mixing them up.
Use NMI Gateway As Your Funnel Payment Option
Now that you have connected your NMI keys successfully to your DropFunnels account, which means you are ready to use NMI to collect payments from any of your sales funnel!
One of the unique feature on DropFunnels is that you can connect several Payment Gateways such as Stripe, PayPal, NMI, Authorize.net and even CoinPayments.
You can then select which payment option to use in EACH individual funnel! Cool right??!!
IMPORTANT: You must select a payment option for your funnel before your Checkout Form can work to allow your customers to enter their payment information and proceed to checkout.
Also, make sure your sales funnel has been fully set up with Sales Page, Checkout Form page, Upsell/Downsell Pages and finally a Thank You Page with Order Receipt module.
If you haven't built a funnel, please see this guide on How To Create Your First Sales Funnel
Ok so how do we select your funnel payment option?
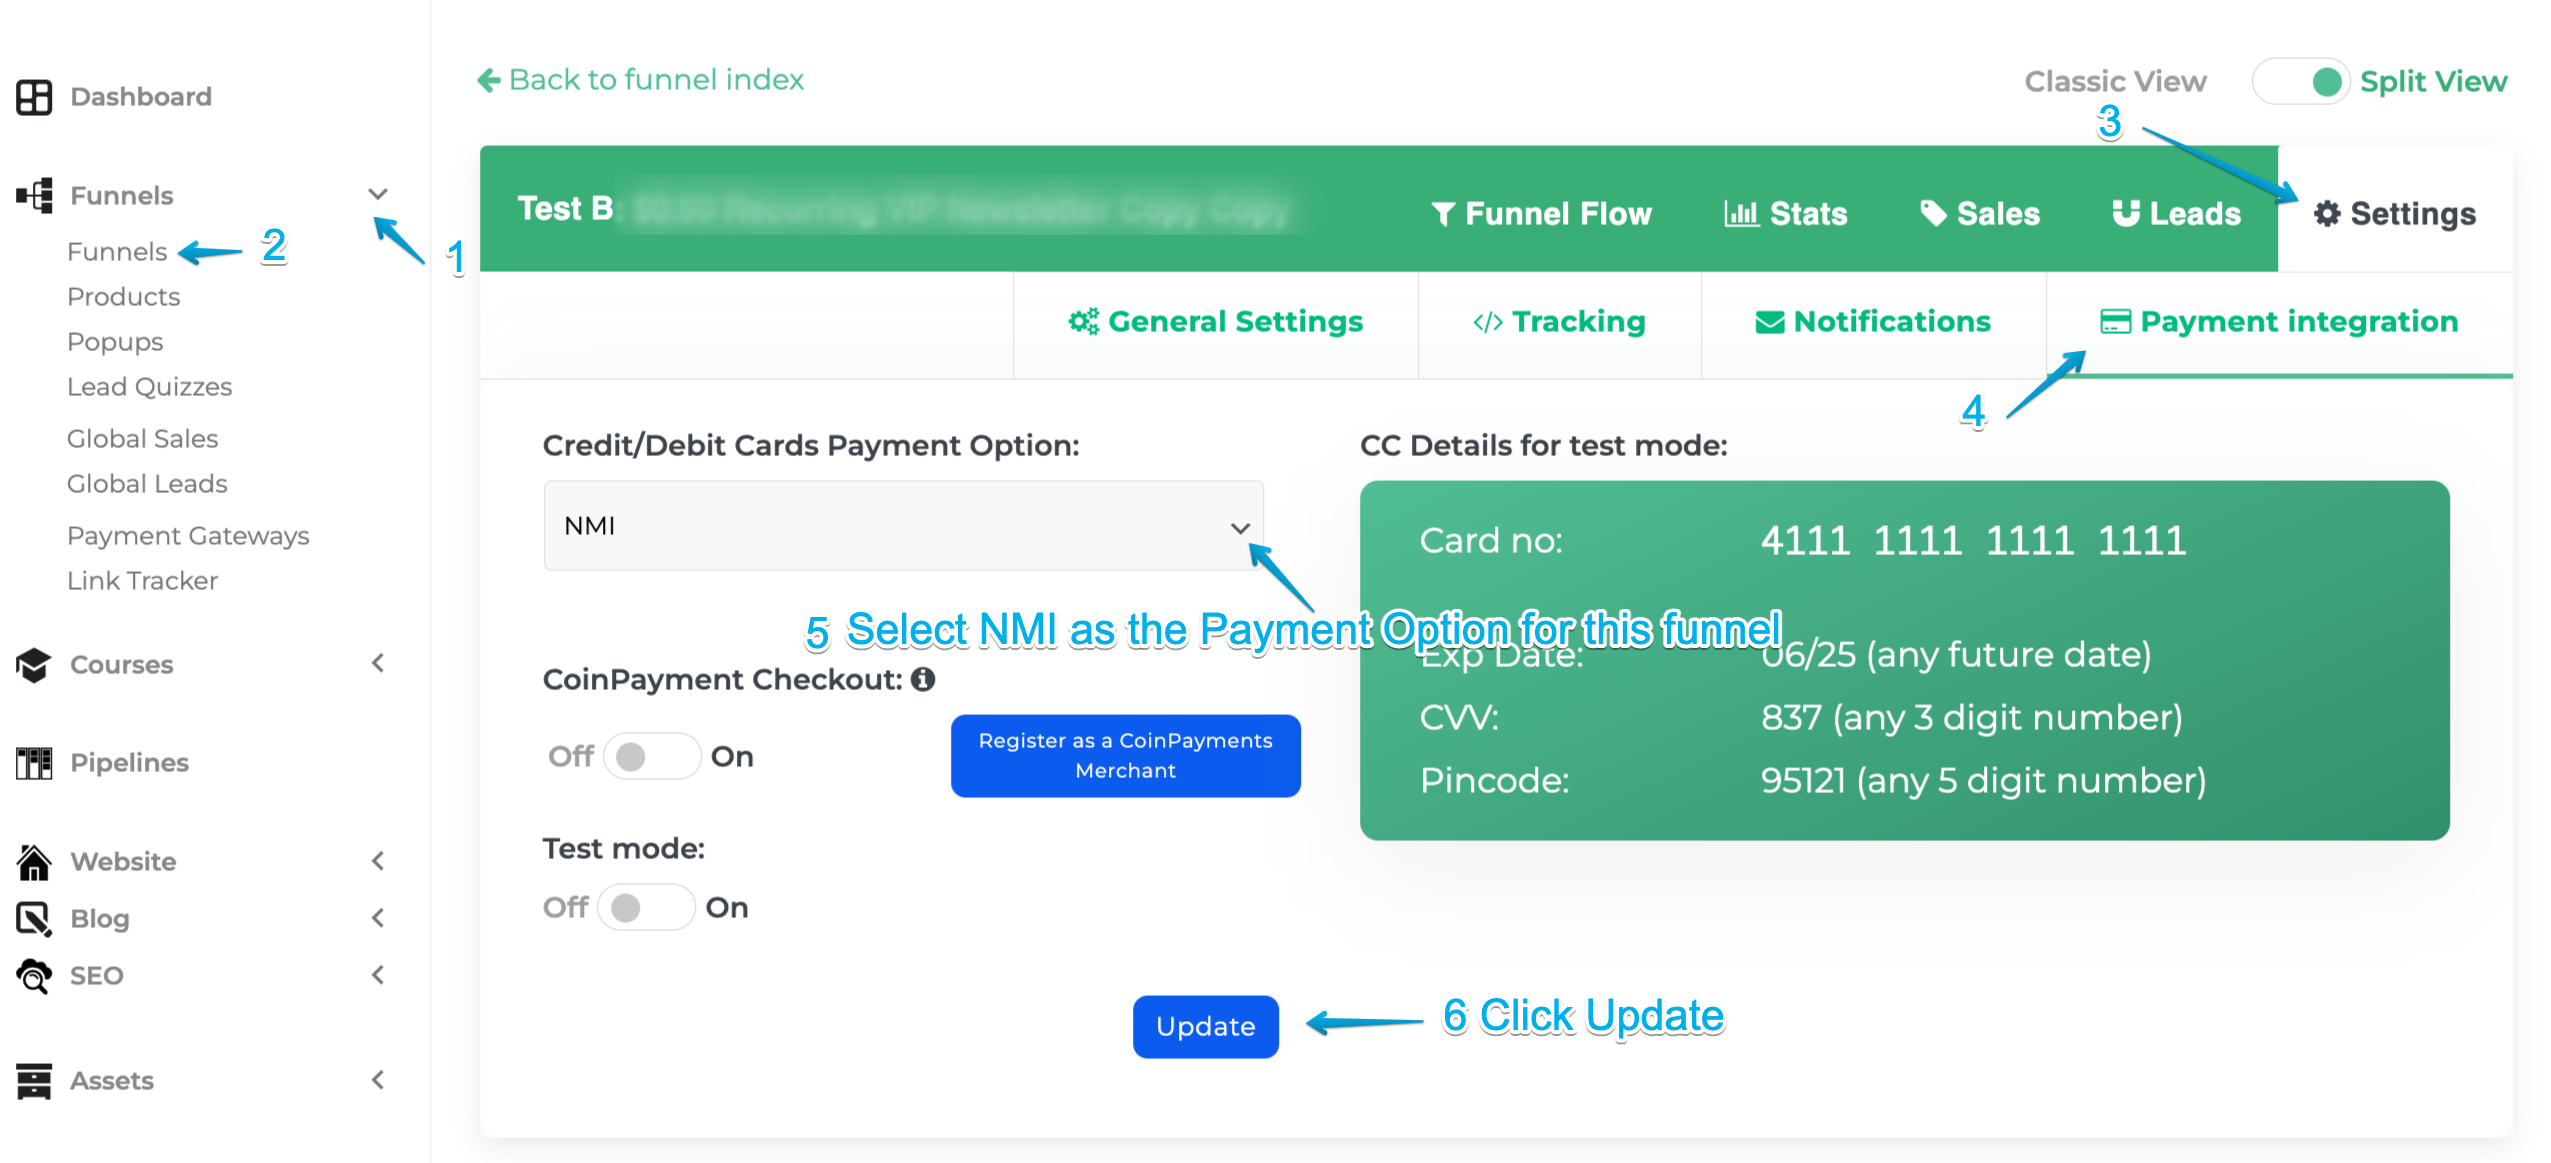
Step 1: Go to the funnel that you want to start collecting payments.
Step 2: Go to Settings > Payment Integration > Credit/Debit Cards Payment Option > click the dropdown and you should see NMI (and other payment gateways you've connected)
Step 3: Click Update. Now the funnel you've selected is fully connected to your NMI gateway and is ready to collect live payments.
NOTE: For test transactions, please click here for instructions to set up.
How To Test Transactions With NMI
Always before your funnel go live, you would want to test your entire funnel flow to ensure a smooth checkout process for your customers.
Follow the steps below to run transactions in Test Mode.
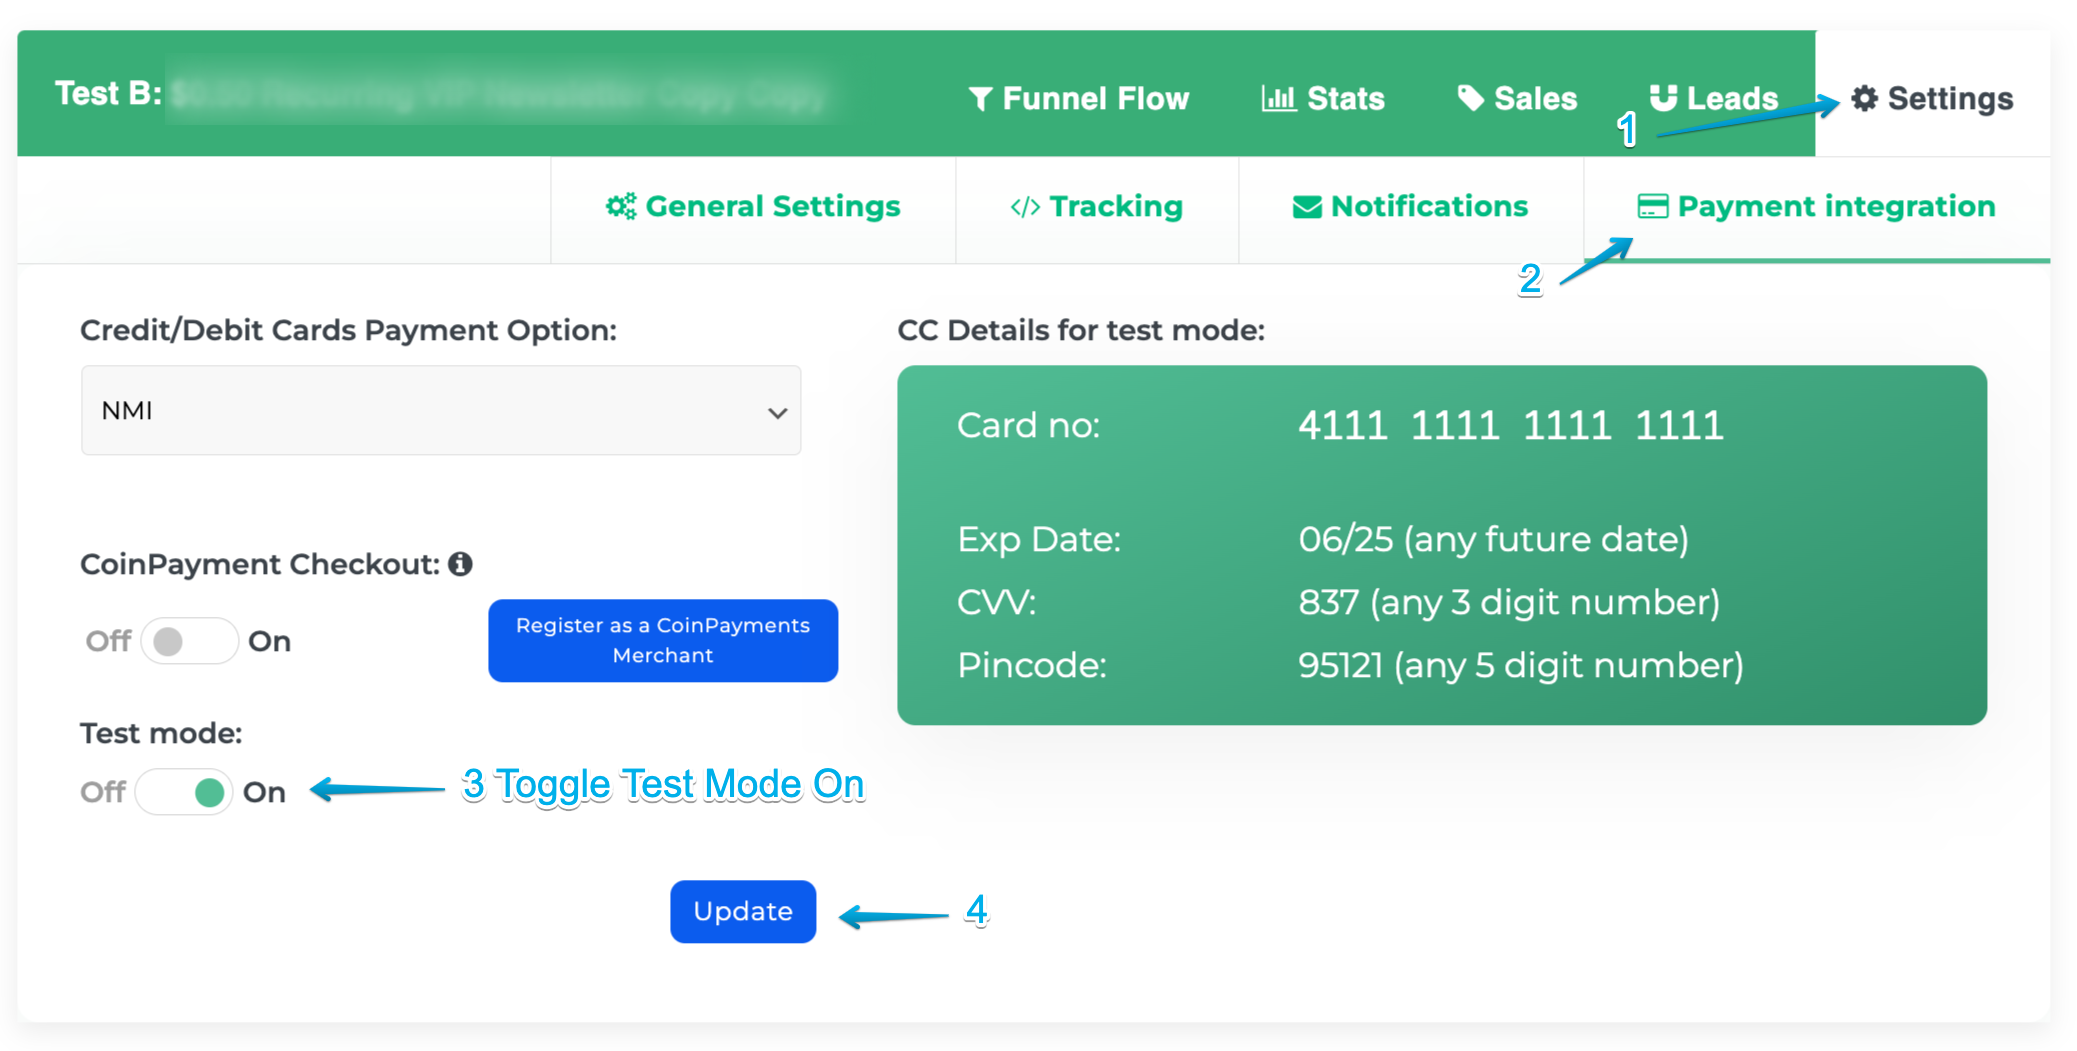
Step 1: Inside the Funnel, Go to Payment Integration and Enable "Test mode".
Step 2: Click Update to save the changes.
Step 3: Copy the Funnel/Checkout URL to perform a test purchase. You can use the NMI test mode card information below:
Unlike Stripe payment gateway, NMI has its own limitations when it comes to testing transactions for your funnel.
Limitation 1: There are no Test Keys or Sandbox Keys.
Limitation 2: Recurring Payment Products will not work on TEST mode for NMI gateway.
Turn Back to Live Mode
After you complete all testing and your funnel is ready to go LIVE, make sure you go through all the checks below. Failure to do so will put your funnel as well as your NMI account in Test Mode, thus losing sales!
On your DropFunnels account:
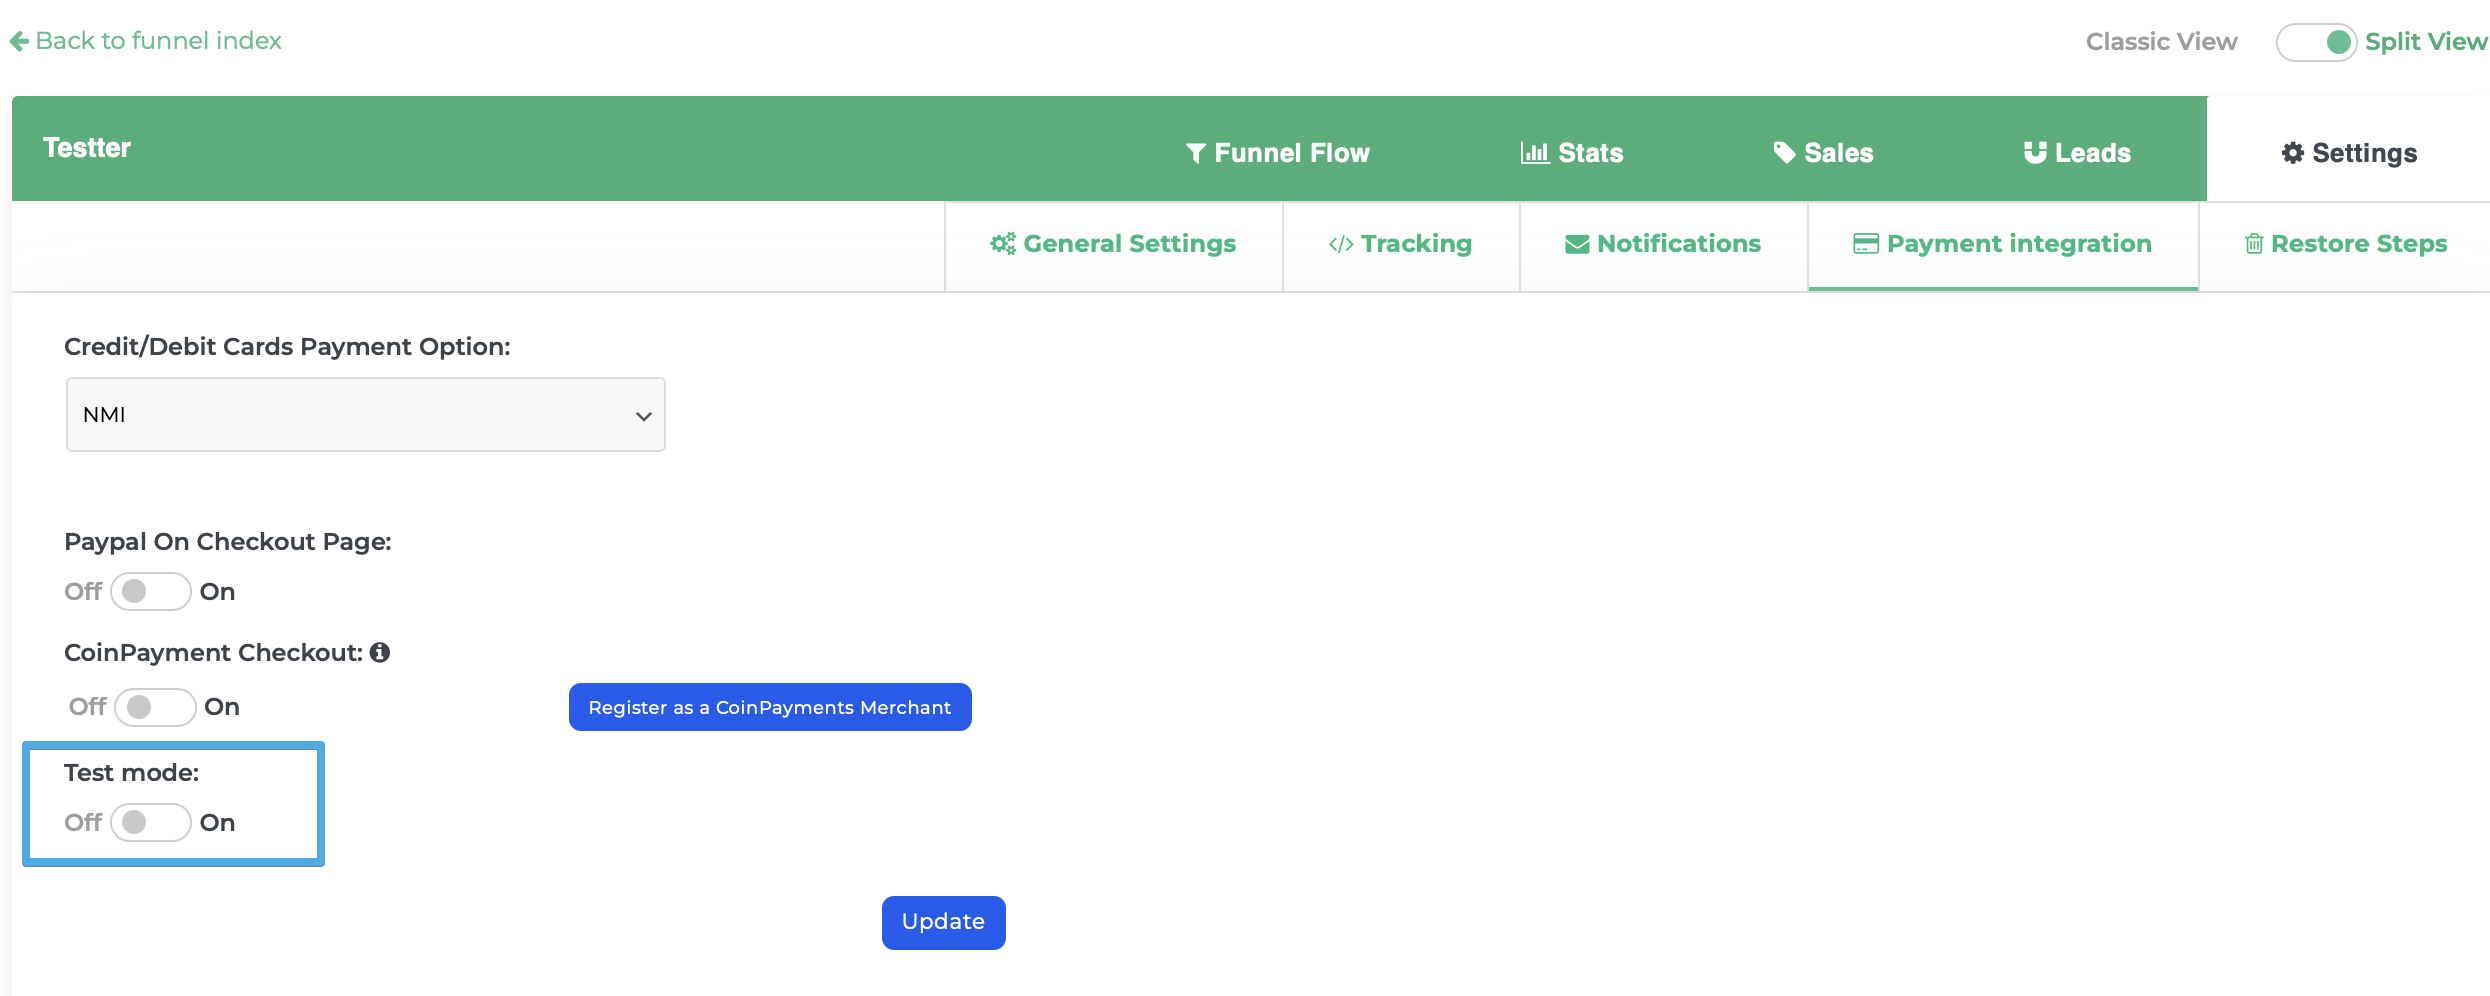
Make sure your funnel's Test Mode is toggled OFF.
Now everything should resume back to live mode.

